Display component naming.

Main control buttons you see start gps instead of start sensors on a none ANT capable system.

The What buttons let you select what the none instantaneous display items display, all data, the current bike, the current trip and the current lap.

You can enable or disable the display of these buttons for each screen.


Automatic main sensors readout.  This is the area displaying the main sensors instantaneous values for Speed, Cadence, Heart Rate and Power. 

The automatic main sensor readout area automatically adjusts itself to display just the sensor information you have available.  With no sensors you just get GPS based speed and Virtual Power if you have enabled it for the bike.


The automatic main sensor display here is just showing speed which is what you get on a none ANT capable system or if you don't have any other sensors active at the time.  


The Control buttons and What buttons take up valuable screen space and there is an option to get this space back by having them share the same space as the Automatic main sensor display area.  When you are riding (having gone start trip) the Automatic main sensor display is on the top but the buttons are still press-able.  If you want to bring the buttons back to the front you can use the menu button or press just below the main buttons. 


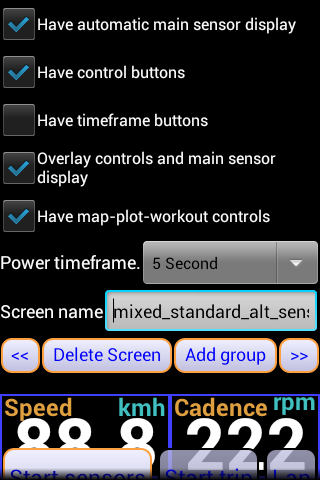
Below the top area where the Main control buttons, What buttons and Automatic main sensor display can be placed there is the area for user customisable data.

The data is displayed in groups of lines.  A group can have a single line or multiple lines of data in it.  A line can have one or more Items in it. 

If you have more then one line in a group then you can either have the group in an expanded state with all the lines visible or a collapsed state where only one line is visible.  If all the lines in a group are the same size you get the lines switching between each other when collapsed.  If the lines are different sizes then you just get the first line displayed when collapsed.


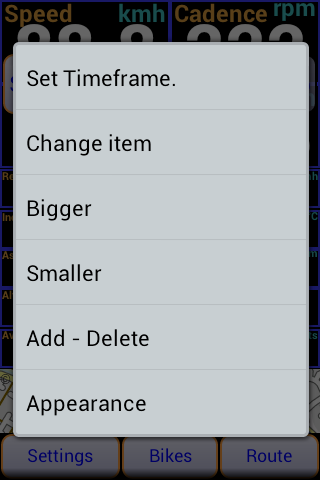
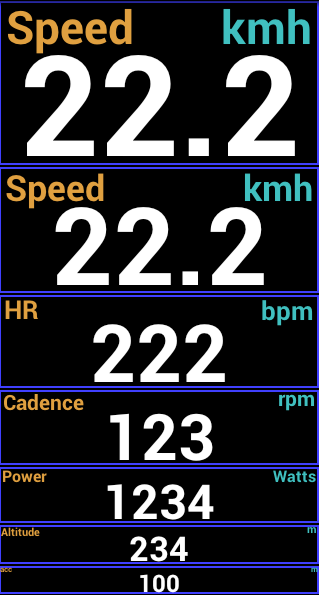
Each line can be configured with one of 7 text sizes as shown here. 

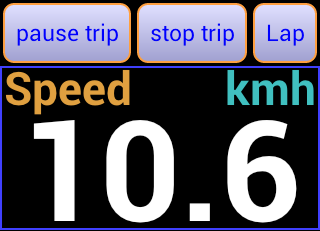
The very large size is so large that only one smaller item can be displayed. 

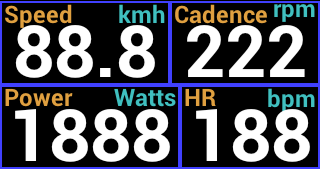
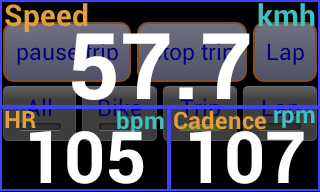
The medium sizes where a couple of items can be displayed side by side and still be fairly large and legible. 

The Smallest size will let you put a good number of items side by side but reading them while riding may be hard.


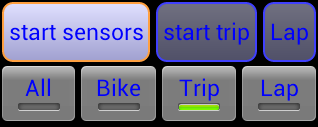
Once you go start sensors all display items related to a specific sensor type are removed from the screen initially.

As the different sensor types get found the display items get added back onto the screen.  If the item is not displayed it means the sensor is not working or has not been found yet.

This lets you know which sensors are working and saves the screen space for the sensors that want give you anything to see.

Configuring the top area.

You can only edit the display when not actively riding.  Keep swiping left for the option to add a new screen.  Swipe down to display the main configuration options for a screen.

You can select if you want the Automatic main sensor display area, with an ANT system I normally have it as it automatically adjusts to the sensor I have at any given time.  With gps only where you only have speed you may prefer not to have it and to add a spreed item explicitly.

You can also decide if you want the Main control buttons and the What buttons.

If you have the Automatic main sensor display and Control or What buttons then you get the option of overlaying them into the same screen space.

You can select if you want space for the Map - Plot - Workout control area.

You can also configure the style of display used for the power data in the main sensor display area e.g. you can have a moving average instead of the instantanious value.

You can rename the screen which is advisable if you want to modify the defaults considerably.

The buttons allow you to move the screen in the left right swipe order delete it all together or add an initial group if there is none on the screen yet and you want one.

Modifications affect the screen below in real time so you can scroll down to check the effect.

Having setup the main options for the screen editing the group, lines and items is normally done from with the configuration screen hidden.  You can swipe up to hide it totally.  A long press on any item will bring up a menu to allow you to modify things. 


Set Timeframe is only an option on items ver a period of time e.g. Averages, min, max, distance etc.  By default these items use a timeframe configured with the what buttons but this option lets you over-ride the timefram for a specific item.  This would allow you to have say the lap and ride average speeds both on the same screen.

Change item, brings up a dialog to let you choose what you want to display for this item.  The items are listed hierarchically and hopefully you will be able to find what you want relatively easily.

Bigger makes the text in the current line one size bigger.

Smaller makes the text in the current line one size smaller.


Add - Delete gives you a sub - menu for adding and deleting items.


Appearance gives you a submenu for changing the appearance of an individual item.


Delete item deletes the item if it's the only item in the line then the line is deleted if it's the only line then the group is deleted.

Add item adds a new item the current line.  The item is added to the right of the current item.  When you add an item you get to choose what you want displayed in the itme.

Add line adds a new line to the current group.  The line will have a single item slot initially that you need to select and item for.

Add group adds a new group with a single line below the current group.  The line will have a single item slot initially that you need to select and item for.


Default Appearance resets any appearance customisation.


The various colour options let you change the colours used so you could, for example, have a dark on light style setup or a checkerboard type pattern.   In the colour picker dialog press the panel bottom right to select the colour you have chosen.


Custom label lets you put in totally customized label text if you want.